Page 1 of 3

Sealer testing

Posted: Thu May 19, 2011 1:58 pm
by Kris Jorgensen
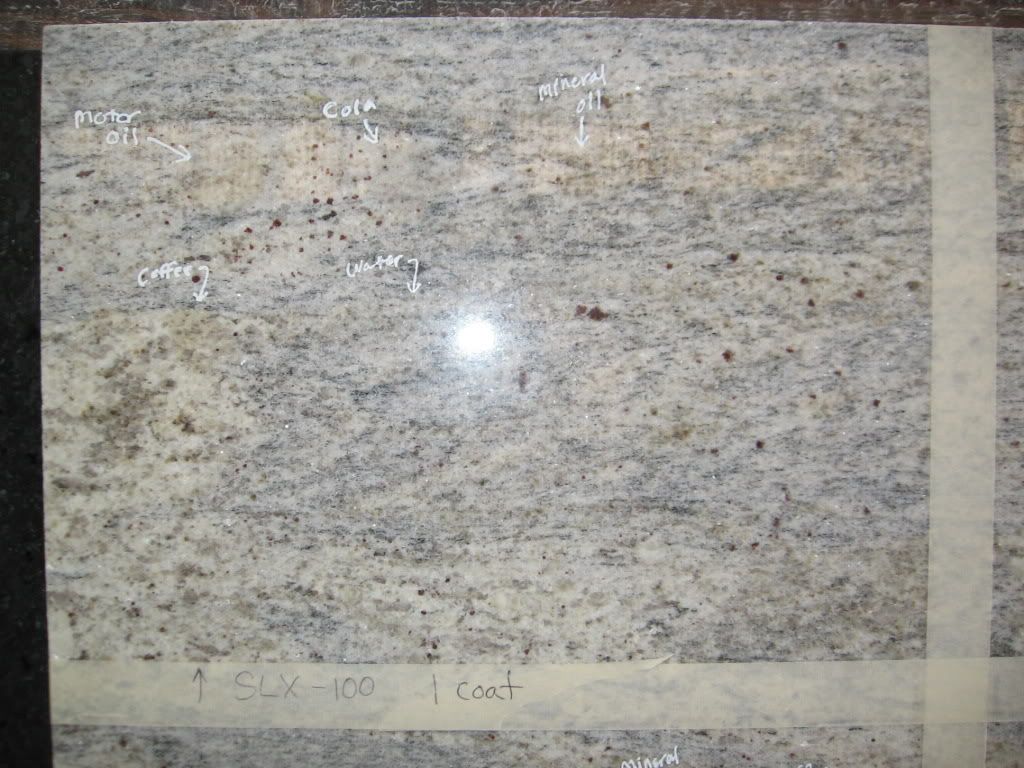
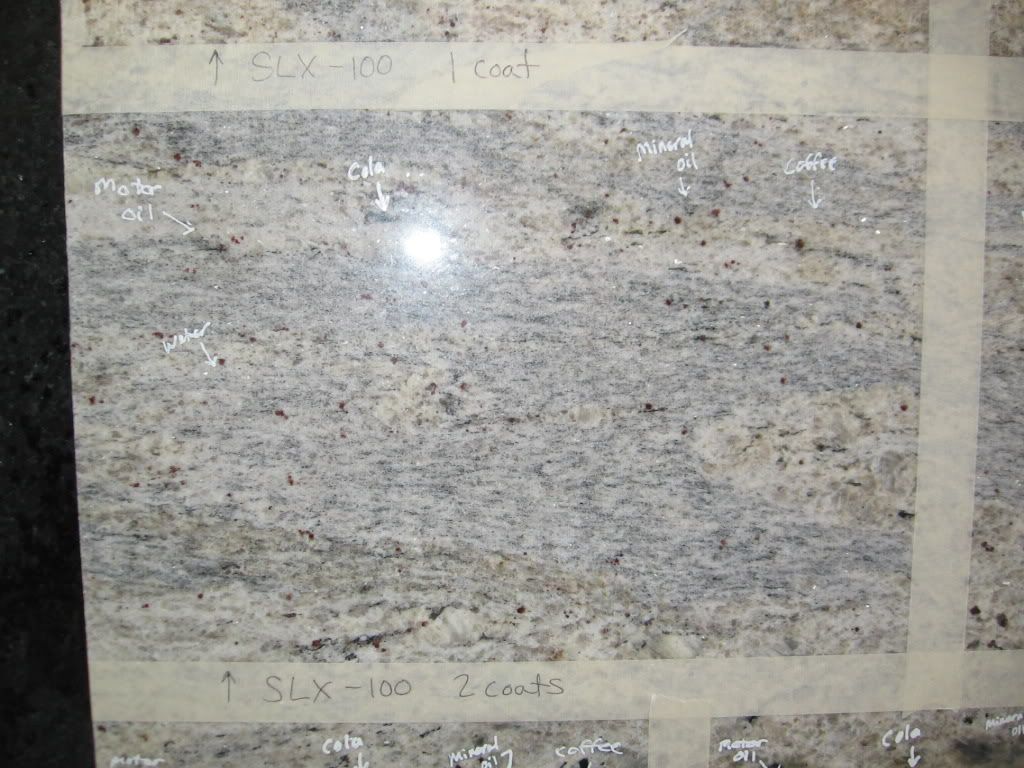
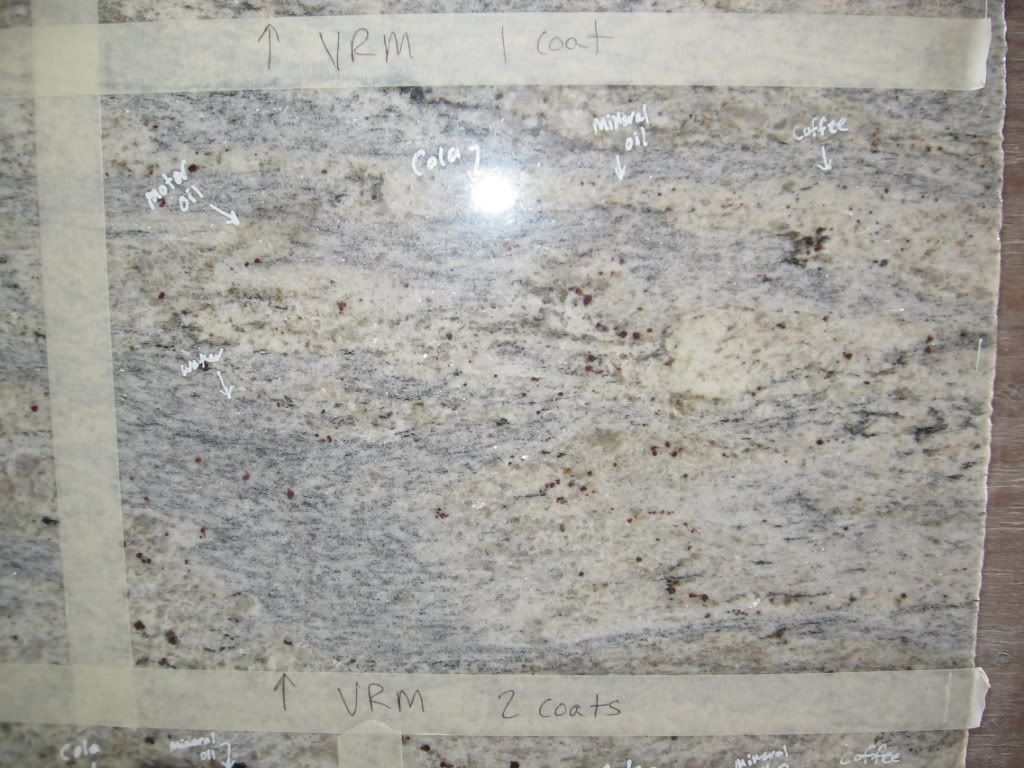
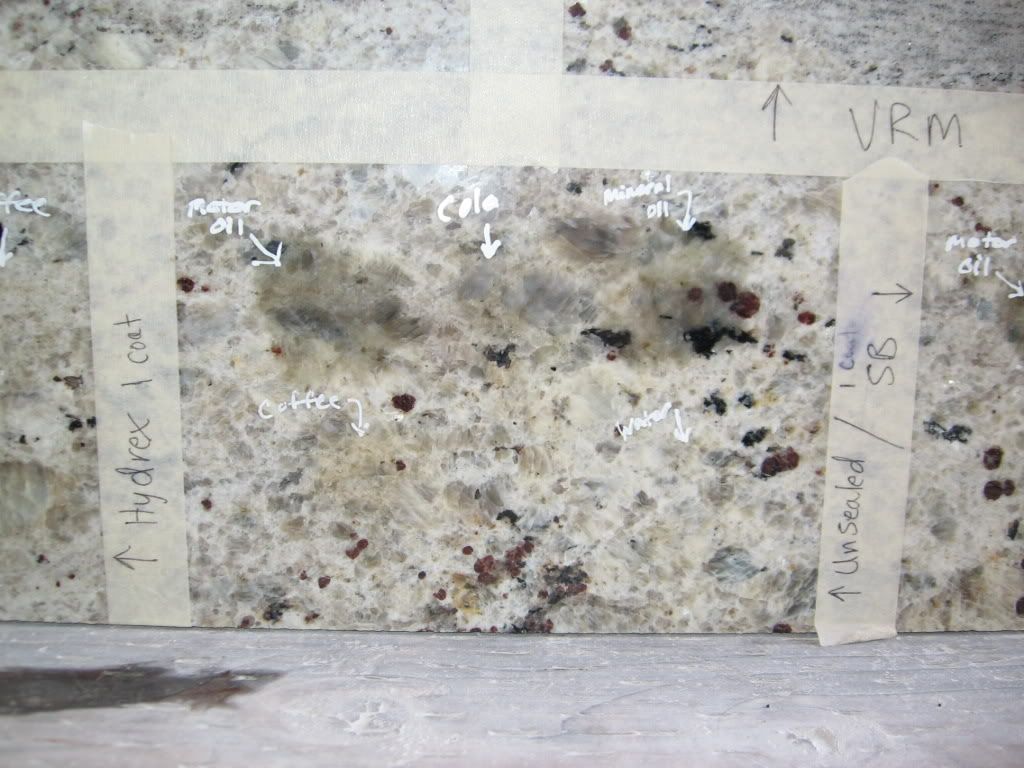
All testing was done on Kashmir White polished granite.

Image

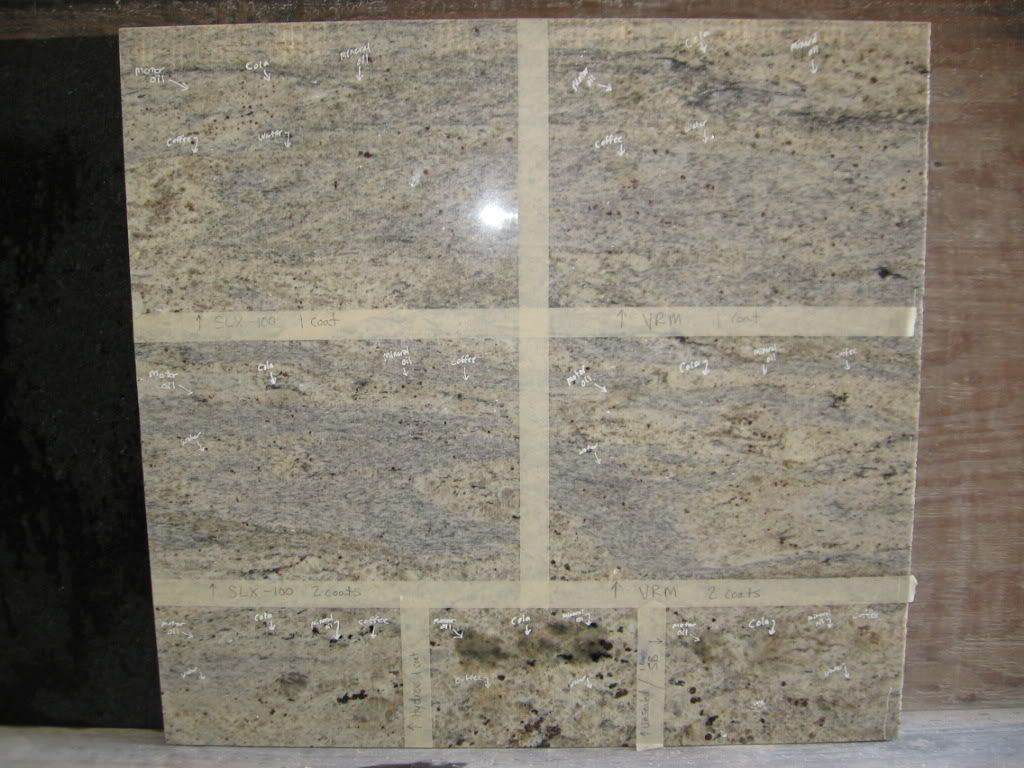
The sealers tested were Prosoco SLX-100 (1 coat and 2 coats), STT VRM (1 coat and 2 coats), Tenax Hydrex (1 coat), and STT SB (1 coat). I also tested an unsealed area.

Each of the sealers were applied as a light coat and kept wet on the surface for 1 minute then left on the stone for approximately 3 - 5 minutes before buffing off. The SLX-100 and the VRM only slightly darkened the stone and dried back the original color within a few minutes. The second coat of SLX-100 and VRM were applied about 10 minutes after the stone appeared dry. The SB darkened the stone more than the SLX-100 and VRM and took a couple hours to dry out. The Hydrex darkened the stone the most and took overnight to dry out. All sealers were easy to work with and buffed off easily.

The products used to test for staining were new motor oil, cola, mineral oil and coffee. I also tested with water by putting a piece of hard plastic over a puddle of water. The water test was done to represent a glass left on the counter with water under it, which seams to force the water into the stone creating rings and takes a while to dry out.

Each of the sealers mentioned above were subjected to the same test after allowing the sealers 24 hours to cure. Each of the products used to stain the stone were left on the stone for 24 hours.

The SLX-100 (1 coat) showed slight staining from all of the products, but the coffee was the most noticeable. When the plastic was lifted from the water puddle and the water was dried from the surface, there was a dark spot that took about 1 hour to dry out.

Image

The VRM (1 coat) showed slight staining from the motor oil and coffee. There was no noticeable stain left from the cola and mineral oil. When the plastic was lifted from the water puddle and the water was dried from the surface, there was a dark spot that took about 2 hours to dry out.

Image

The SLX-100 (2 coats) showed very faint staining from all of the products. When the plastic was lifted from the water puddle and the water was dried from the surface, there was a dark spot that took about 1 1/2 hours to dry out.

Image

The VRM (2 coats) showed no staining from any of the products used except for the water test. When the plastic was lifted from the water puddle and the water was dried from the surface, there was a dark spot that took about 3 hours to dry out.

Image

The Hydrex (1 coat) showed no staining from any of the products used. When the plastic was lifted from the water puddle the water under the plastic beaded up into a puddle and was easily wiped from the stone. There was no penetration of water and no dark spot left.

Image

The SB (1 coat) showed significant staining from all of the products. When the plastic was lifted from the water puddle there was no water left as it had all penetrated into the stone. There was a slight dark spot from the water that dried out in less than 1 hour.

Image

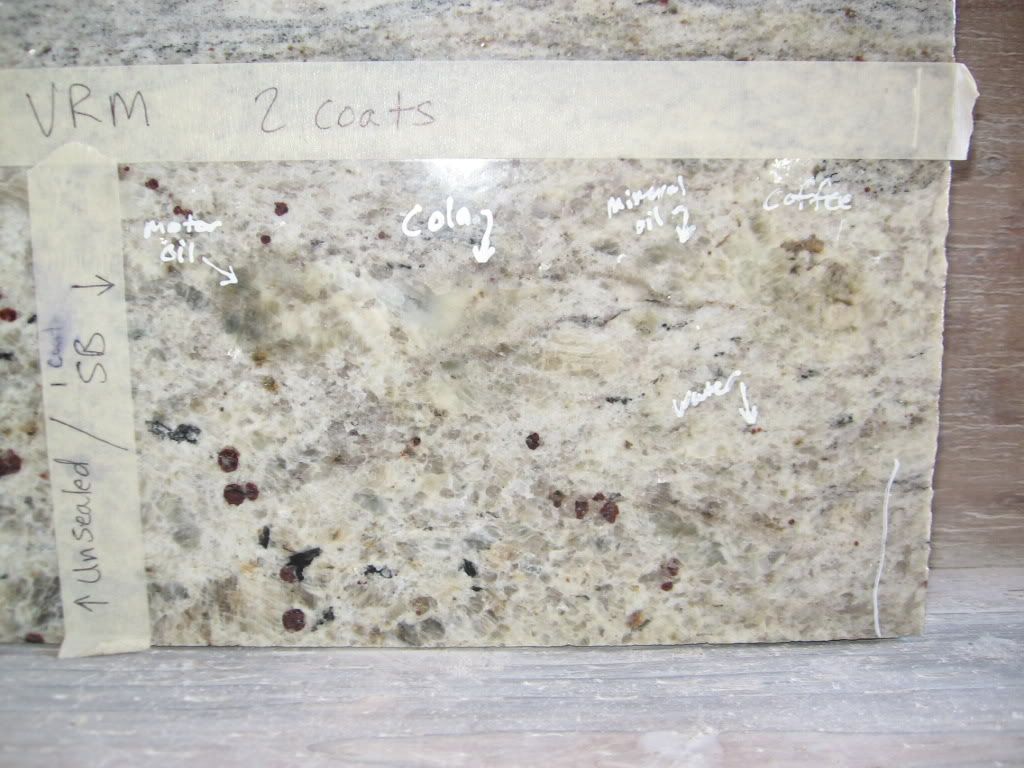
The unsealed stone stained badly from all of the products. When the plastic was lifted from the water puddle there was no water left and the stone was already dry underneath.

Image

The winner of this test was the Tenax Hydrex. It outperformed all the others with only one coat. In addition it is the least expensive of the sealers tested. The Hydrex is about 1/3 the cost of the others which makes it a great value.

I have samples coming from Defusco of the Tenax Proseal and the Tenax Protex. Once I get those samples I will be performing another test.

Re: Sealer testing

Posted: Thu May 19, 2011 2:11 pm
by Todd Luster
Thanks Kris for doing this and sharing.
Good info.

Re: Sealer testing

Posted: Thu May 19, 2011 3:13 pm
by t-mobile
Thanks a bunch kris! I will be ordering some hydrex. Is it defusco that has it?

Re: Sealer testing

Posted: Thu May 19, 2011 3:38 pm
by Kris Jorgensen
Yes, I got it from Defusco a while back but didn't try it until now.

Re: Sealer testing

Posted: Thu May 19, 2011 4:18 pm
by GuyboR
Kris Jorgensen wrote:I have samples coming from Defusco of the Tenax Proseal and the Tenax Protex. Once I get those samples I will be performing another test.
Because I'm lazy I'll ask you to do it. :lol:

Can you add the GQ sealer to the next test please.

Thanks

Re: Sealer testing

Posted: Thu May 19, 2011 4:40 pm
by kevinp
...and MB4 :grin:

Re: Sealer testing

Posted: Thu May 19, 2011 5:27 pm
by Kris Jorgensen
Guy, I'll try to get a sample of the GQ sealer from my GQ rep and I'll add it to the test. What is the name of that sealer?

Kevin, send me a small sample of the MB4 and I'll test that too. I'll only need a half a shot glass worth. My shop address is 9100 113th Dr SE, Snohomish, WA 98290.

Re: Sealer testing

Posted: Thu May 19, 2011 9:42 pm
by scott m
pretty much exactly the same results I got testing the stt products. The gQ sealer will give the same results as the tenax.

Re: Sealer testing

Posted: Thu May 19, 2011 10:47 pm
by GuyboR
Kris Jorgensen wrote:Guy, I'll try to get a sample of the GQ sealer from my GQ rep and I'll add it to the test. What is the name of that sealer?
413S

If Brian can't get you a quart for testing, let me know and I'll get some to you.

Re: Sealer testing

Posted: Fri May 20, 2011 12:47 pm
by ash20ash
Great work Kris.m Thanks for doing this and posting the results for all to see. Class act!

Looks like I will be getting some Tenax..................

Re: Sealer testing

Posted: Sat May 21, 2011 2:58 pm
by kdnoel
Thanks for taking the time to do this and share with us.

Re: Sealer testing

Posted: Sat May 21, 2011 7:16 pm
by Chris Mills
Very interesting. So much for the STT being the cats ass :shock:

Re: Sealer testing

Posted: Sat May 21, 2011 10:37 pm
by Kowboy
Kris:

Thanks for taking the time to test and post. I appreciate it.

Joe

Re: Sealer testing

Posted: Sun May 22, 2011 6:25 am
by DavidL
Chris Mills wrote:Very interesting. So much for the STT being the cats ass :shock:
Don't take this wrong, not defending STT except that the directions for application are not being followed based on Kris' statement describing his application timeframe. Now, I have absolutely no problem with that. His testing methodology is to apply each in the same manner for the same duration of time to get an even baseline. I like that. But it will show some detriment to products known to need more time to be effective. It will also show which products can be used/applied in the real way that fabricators will do it, FAST.

Thank you Kris for taking the time to do these tests and sharing your results. Excellent example to the rest of us.

Re: Sealer testing

Posted: Sun May 22, 2011 7:00 am
by Clyde Kingry
Have you done the test yet? If there is time, can I send you some Dupont Stonetech product to include for comparison? I have some sample sizes I think.

ImageImage

Kris Jorgensen wrote:Guy, I'll try to get a sample of the GQ sealer from my GQ rep and I'll add it to the test. What is the name of that sealer?

Kevin, send me a small sample of the MB4 and I'll test that too. I'll only need a half a shot glass worth. My shop address is 9100 113th Dr SE, Snohomish, WA 98290.

Re: Sealer testing

Posted: Sun May 22, 2011 9:15 am
by kdnoel
We have used Miracle Impregnator 511 for over 5 years... would like to see how it stacks up to the rest. We have had no issues with it. We keep a jug of the Porous Plus for those known sponge rocks.

It is pretty hard to buff off by hand but as the saying goes... no pain, no gain.

Re: Sealer testing

Posted: Mon May 23, 2011 6:42 pm
by Kowboy
DavidL wrote:
Chris Mills wrote:Very interesting. So much for the STT being the cats ass :shock:
Don't take this wrong, not defending STT except that the directions for application are not being followed based on Kris' statement describing his application timeframe. Now, I have absolutely no problem with that. His testing methodology is to apply each in the same manner for the same duration of time to get an even baseline. I like that. But it will show some detriment to products known to need more time to be effective. It will also show which products can be used/applied in the real way that fabricators will do it, FAST.

Thank you Kris for taking the time to do these tests and sharing your results. Excellent example to the rest of us.
David:

You make an excellent point. It hardly seems fair to compare sealers that have not been applied per the manufacturer's application instructions. Some may require more applications and that may make them less cost effective but may increase performance.

Joe

Re: Sealer testing

Posted: Mon May 23, 2011 7:38 pm
by Kris Jorgensen
David, how was the STT not applied properly?

Re: Sealer testing

Posted: Mon May 23, 2011 7:47 pm
by Eddie Blanco
Apart from not being applied as per manufacturers specs, these sealers all use different carriers to deliver the solids. Meaning they all evaporate/penetrate at different rates. It's not a fair comparison to any of them, unless done properly. Now if you're looking for quick and easy that's a whole other ball of wax.

Re: Sealer testing

Posted: Mon May 23, 2011 7:52 pm
by Eddie Blanco
Kris Jorgensen wrote:David, how was the STT not applied properly?
Here is what is on the back of the can.

Directions:
Read entire label and follow directions precisely. Test in a small inconspicuous spot and allow 24 hours to pass to assess product effectiveness. Grout should be installed for 72 hours before using SB-Sealer. Make sure surface is clean, dry and free of waxes. Wear appropriate safety gear including eyewear and gloves. Ventilate area during application and while product is drying.
Keep off the surface until the product is dry. Keep product out of childrens’ reach.
1) Shake well. Apply evenly and liberally with either a paint pad, roller, brush, or pump up chemical resistant coarse sprayer. Wait 10-15 minutes
to assess how the material is absorbing SB-Sealer. Keep adding more as required to keep the area wet with SB-Sealer. Wipe off any excess. 2) Apply a second liberal coat and let stand for 45 minutes. Wipe off excess.
3) Buff dry and remember SB-Sealer achieves maximum effectiveness 24 hours after application. 4) More absorptive stones will require additional applications.

Re: Sealer testing

Posted: Mon May 23, 2011 8:01 pm
by clhilde
Eddie Blanco wrote: Now if you're looking for quick and easy that's a whole other ball of wax.

We are fabricators in a world where time is everything.We want fast and effective.Not expensive and time consuming.Less time = More profit

Re: Sealer testing

Posted: Mon May 23, 2011 8:17 pm
by Kris Jorgensen
Eddie Blanco wrote:
Kris Jorgensen wrote:David, how was the STT not applied properly?
Here is what is on the back of the can.

Directions:
Read entire label and follow directions precisely. Test in a small inconspicuous spot and allow 24 hours to pass to assess product effectiveness. Grout should be installed for 72 hours before using SB-Sealer. Make sure surface is clean, dry and free of waxes. Wear appropriate safety gear including eyewear and gloves. Ventilate area during application and while product is drying.
Keep off the surface until the product is dry. Keep product out of childrens’ reach.
1) Shake well. Apply evenly and liberally with either a paint pad, roller, brush, or pump up chemical resistant coarse sprayer. Wait 10-15 minutes
to assess how the material is absorbing SB-Sealer. Keep adding more as required to keep the area wet with SB-Sealer. Wipe off any excess. 2) Apply a second liberal coat and let stand for 45 minutes. Wipe off excess.
3) Buff dry and remember SB-Sealer achieves maximum effectiveness 24 hours after application. 4) More absorptive stones will require additional applications.
That's for the SB. What about the VRM?

Re: Sealer testing

Posted: Tue May 24, 2011 6:54 am
by Eddie Blanco
clhilde wrote:
Eddie Blanco wrote: Now if you're looking for quick and easy that's a whole other ball of wax.

We are fabricators in a world where time is everything.We want fast and effective.Not expensive and time consuming.Less time = More profit
Chris I know this, but you take your time for glue to dry, polish stone correctly, use an appropriate blade etc. Fastest isn't always best.

Re: Sealer testing

Posted: Tue May 24, 2011 6:55 am
by Eddie Blanco
Kris Jorgensen wrote: That's for the SB. What about the VRM?
VRM:


APPLICATION
Wear appropriate safety gear and make sure there is adequate ventilation. Test in a small inconspicuous
area and allow 24 hours to pass in order to evaluate product effectiveness. Grout should
be installed 72 hours prior to using SB VRM (15 YEAR SEALER). Make sure surface is
clean, dry, and free of waxes. We recommend our SICLN and SCCLN Solvent Cleaner for
surface preparation.
1) Shake well. Apply evenly and liberally with a pad, roller, brush or chemical-resistant coarse
sprayer. Wait 10-15 minutes to assess how the material is absorbing SB VRM (15 Year
Sealer). Keep adding more as required to keep the area wet with SB VRM (15 Year Sealer). Wipe
off any excess.
2) Apply a second liberal coat and let stand for 45 minutes. Wipe off any excess.
3) Buff dry with a paper towel or, preferably, a microfiber cloth. Remember SB VRM (15 Year
Sealer) achieves maximum effectiveness 24 hours after application.
4) More absorptive stones will require additional applications.
For daily cleaning, we recommend our EZCLN neutral “sealer reinforcing” cleaner.
CAUTION: Keep out of reach of children. May be harmful if swallowed.

Re: Sealer testing

Posted: Tue May 24, 2011 7:02 am
by Dan R.
I was told to apply with a gloved hand. I was never notified of an applicator recommendation change. Is the gloved hand still ok?

How do you determine if more is needed during the initial application?

Flooding seems to be a waste of sealer, imo.