


In a previous thread, it was brought up to create a new tool.
Great idea. Probably wouldn't have ever thought about that. But it makes total since.
Are there any other little tricks you guys do that Im probably not thinking of? Being very new to the cnc thing.
What other tools do you set up different tools with? Superz I guess would be one.
Also. Do you save the toolpaths to your sinks? I 40 mm sink tools on all my sinks. Would it be ok to save those with the dxf?
programing tips
Re: programing tips
I think this is an area overlooked at workshops. CNC tips and tricks roundtable and programming in alpha, easy would be a hit......
Scott McGourley
Tampa, FL
"You can either watch it happen, make it happen or wonder why the F^&K it happened" --Phil Harris-- The Deadliest Catch (RIP)
Tampa, FL
"You can either watch it happen, make it happen or wonder why the F^&K it happened" --Phil Harris-- The Deadliest Catch (RIP)
-
John McDowell
- Posts:417
- Joined:Thu Dec 03, 2009 10:14 am
- Been thanked: 1 time
Re: programing tips
Ash,
With well over 1000 hours on a NW138
-I would reccomend using Mr Direct sinks exclusively, I like the fact you can trust their
Dxf's straight from the website without having the sink in front of you.
-Definitely save the toolpaths to the sink and insert.
- Instead of expensive T-31 bits, use a 3/16 blind core bit and drill a bunch of
holes around the perimeter of the sink flange that you have drawn for your sinks.
Then buy plastic greenlee anchors from grainger.
You tap them into the 3/16" holes and they hold sinks as well as any system, yet they cost 7 cents an anchor.
Plus the 3/16" bit drills fast and is cheap.
- I would run corner savers on each corner of the blanks you cut
from your bridge saw and make this the first operation. This way you can tell
if your pieces are set correctly if the laser happens to be off and then you don’t get
any mistakes from possible operator setting or laser error.
- Use a mirrored word and make a set routine to make sure you mirror the pieces at the
same point in the programming routine. (every programmer has screwed up a piece by
not mirroring the stone for face down processing)
-Set up a numbered routine for programming the table, so at some point you will have
an employee doing what you are now.
-When cutting say a large radius bartop, make a break at the middle of the radius and bring
the finger bit in from the outside and come off the piece in the middle rather than running
the finger bit all around the piece. This will eliminate corners
breaking off.
- Get used to making breaks and bring the finger bit from the outside and come in when
programming angled pieces.
-Use the manual lead in and lead out function.
-Run the seam tools before the profile bits so you don’t blow up your polishing wheels on rough stone.
-Set up a dual monitor on your programming computer and have one screen with the fully buttoned up
drawing on one monitor and the table you are programming on the other monitor.
Last edited by John McDowell on Wed Jan 26, 2011 8:42 am, edited 1 time in total.
Email: Granitedoc1@Gmail.com
-
ash20ash

- Posts:3932
- Joined:Sun Nov 01, 2009 9:00 am
- Location:Georgtown,IN
- Has thanked: 5 times
- Been thanked: 20 times
- Contact:
Re: programing tips
Thanks John.
Everybody else SUCKS. Comr on guys. Give it up. There has to be more tips.
Everybody else SUCKS.
-
ChrisYaughn

- Posts:1826
- Joined:Sun Oct 25, 2009 8:20 pm
- Been thanked: 5 times
Re: programing tips
It looks like alot of my easystone thoughts don't translate into alphacam, or the tool setups you guys have.
sorry...
sorry...
-
Marmi Natural Stone
- Posts:179
- Joined:Thu Dec 03, 2009 8:30 am
Re: programing tips
I created a word document on my programming computer and called it cnc log. I store info about tools, speeds, feed rates, and any changes that I make. I note when a finger bit is changed or a polish wheel. I also log anything maintenance wise that is done. If I change any tool settings, I write it down so I can refer back to it later if needed.
I also made an excel spreadsheet and I log what is machined everyday: job name, number, material, edge type, # of pieces, and the time that the work took. This can be useful to estimate the time required on similar, future jobs.
I've also started a stone database of materials that I've worked with. I write down how the material machined, if it was fragile or easy to work with, notes about the color and viening, and any problems that happened while machining: broken corners, piece moved, etc.
These aren't programming tips, but just a couple of things that I've found to be helpful when operating cncs and I find that if I don't write it down, I tend to forget exactly when something was done.
Marmi Natural Stone
Norcross, Georgia 30093
770-921-7601
marmistone.com
Norcross, Georgia 30093
770-921-7601
marmistone.com
-
ash20ash
- Posts:3932
- Joined:Sun Nov 01, 2009 9:00 am
- Location:Georgtown,IN
- Has thanked: 5 times
- Been thanked: 20 times
- Contact:
Re: programing tips
.
These aren't programming tips, but just a couple of things that I've found to be helpful when operating cncs and I find that if I don't write it down, I tend to forget exactly when something was done.[/quote]
These are all good ideas. Notes notes notes.............
Some of these I have been doing a little and some I havnt. great thoughts.
It kinda is machine specific I guess. I just find myself constently deleting all the tool paths and breaking this, and joining that. Then program it again. Then delete it cause I missed somting ot thought of a different way.
There are soooooooooo many different ways to skin a cat I guess.
These aren't programming tips, but just a couple of things that I've found to be helpful when operating cncs and I find that if I don't write it down, I tend to forget exactly when something was done.
These are all good ideas. Notes notes notes.............
Some of these I have been doing a little and some I havnt. great thoughts.
It kinda is machine specific I guess. I just find myself constently deleting all the tool paths and breaking this, and joining that. Then program it again. Then delete it cause I missed somting ot thought of a different way.
There are soooooooooo many different ways to skin a cat I guess.
-
John McDowell
- Posts:417
- Joined:Thu Dec 03, 2009 10:14 am
- Been thanked: 1 time
Re: programing tips
Sounds like the biggest problem is using all the breaks to machine the rectangular blank from the bridge saw into a radius or oddly shaped piece. Like a batwing bartop or something.
It takes a little creativity when making these pieces. Makes all your breaks first, then run the set finger on profile areas. Or the regular finger bit along scribed walls(super Z can work also if you are not taking off much material). Then turn the tools off on the operation panel on the right of the screen. Then join your breaks you made on the profile edge and click right reverse tool directions and add the toolpath with polishers to the edge. This will eliminate you having to delete all the tools over and over to get a complete program.
Download greenshot, which is a free screenshot program. Post a picture here of a difficult table you have to program.
Or send me an .ARD file with the pieces already placed on the bed and I will help you out Chris. It would be easier to see a specific table to program. We are getting dumped on by about a foot of snow today, so I am laying around the house instead of refinishing this marble bathroom partition that was scheduled.
Email: Granitedoc1@Gmail.com
-
ash20ash
- Posts:3932
- Joined:Sun Nov 01, 2009 9:00 am
- Location:Georgtown,IN
- Has thanked: 5 times
- Been thanked: 20 times
- Contact:
Re: programing tips
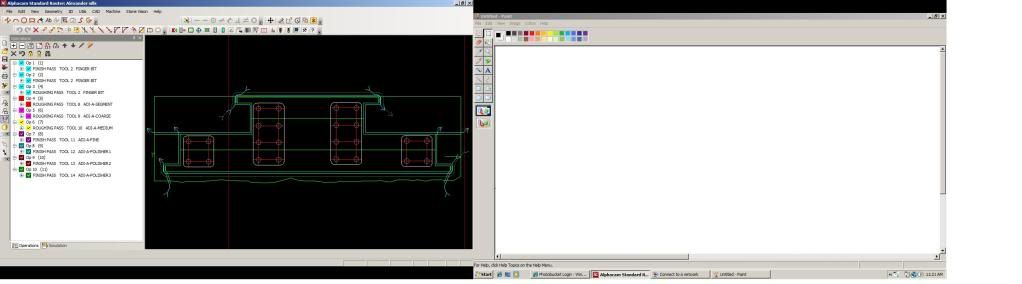
CAnt figure out how to get my other screen off of this. Any ideas?
If you can see this week enough. Would you have programed this the same way? Or what would be a better way?
Its 2 sills being fingered out of a blank. Afetr iw was shaped and polished, I took it to the saw and ripped the 2 pieces out.
-
ash20ash
- Posts:3932
- Joined:Sun Nov 01, 2009 9:00 am
- Location:Georgtown,IN
- Has thanked: 5 times
- Been thanked: 20 times
- Contact:
Re: programing tips
John McDowell wrote:Sounds like the biggest problem is using all the breaks to machine the rectangular blank from the bridge saw into a radius or oddly shaped piece. Like a batwing bartop or something.
It takes a little creativity when making these pieces. Makes all your breaks first, then run the set finger on profile areas. Or the regular finger bit along scribed walls(super Z can work also if you are not taking off much material). Then turn the tools off on the operation panel on the right of the screen. Then join your breaks you made on the profile edge and click right reverse tool directions and add the toolpath with polishers to the edge. This will eliminate you having to delete all the tools over and over to get a complete program.
Download greenshot, which is a free screenshot program. Post a picture here of a difficult table you have to program.
Or send me an .ARD file with the pieces already placed on the bed and I will help you out Chris. It would be easier to see a specific table to program. We are getting dumped on by about a foot of snow today, so I am laying around the house instead of refinishing this marble bathroom partition that was scheduled.
Whats a "set finger"?
Turning the tools off. Thats a good idea. Didnt know you could do that. Just found it
I'll try the green shot here in a bit. I actually just posted this other pic before I saw the reply.
-
John McDowell
- Posts:417
- Joined:Thu Dec 03, 2009 10:14 am
- Been thanked: 1 time
Re: programing tips
Chris,
From what I can see(It's kind of a small picture, greenshot will help). It will let you capture a region instead of print screen,
which captures everything.
I would not try to run the profile bits around the small radius corners of the windowsill.
Extend the line down from the corners and run the profile bits past the part where the tabs are.
Then have the last operation be the finger bit to come in and cut out the area under the tabs.
If its really delicate material. you can use the laser line ans just cut it with a turbo blade after
profiling.
The other thing I would do is put a small blick pod underneath each upper right and left corner of that
piece. This will ensure the the falling piece doens't break off into the piece you are fabricating.
Also what I like to do when cutting intricate things like this with a finger bit, is drill a core hole in the middle
of where the finger bit would come all the way around. Then put a break near the core hole and choose manual
lead in/ lead out and snap the lead out of the finger bit into the middle of the core hole.
This way you are cutting into the piece and bringing the finger bit out. Leaving no room for error.
Then once you cut the outside shape you can remove the excess pieces from under the pods I would
have placed in the corners.
I will post some screenshots when I can make it to my programming computer. We are getting an inch an hour here
and it's supposed to be a foot.
The setfinger is the finger bit you run before profiling so that you leave the over material
for the profile bits to take off. You can create one to use in these situations without having to
add all the tools by going to manage finger bits and copying a finger bit. Rename it setfinger-no profile
or something like that. And leave just make the radius larger than what the finger bit really is.
This tricks it into not cutting directly on the profile line.
So if you normally leave .08 for the segment wheel to take off then increase the radius of this unique
setfinger by .04. So if your finger bit has a radius of .45. Your new setfinger would have a radius of .49.
I know it's confusing but you are doing great. Those small pieces are tricky and taking it to the bridge saw to rip down
is a great idea. You can also make some blocks of es like 18 by 12 inches to fit under your biggest blick pods.
Then use them as fences for cutting really small pieces on the cnc, this will ensure the piece doesn't move.
Email: Granitedoc1@Gmail.com
-
steven nenzel
- SFA Member

- Posts:2085
- Joined:Tue Oct 27, 2009 7:11 pm
- Has thanked: 13 times
- Been thanked: 90 times
Re: programing tips
John has some great ideas but we do not run seams first unless it is a euro miter. If you run the a straight seam before the edge detail, the edge detail will slightly indent on the front of the seam.
Steven Nenzel
Rock-It Surfaces
947 Rancheros Dr
San Marcos, CA 92069
760-597-1800
steven@rockyourhome.com
www.rockyourhome.com
Rock-It Surfaces
947 Rancheros Dr
San Marcos, CA 92069
760-597-1800
steven@rockyourhome.com
www.rockyourhome.com
Re: programing tips
I wonder if you can change that in the software steven. Mine does not do that. I would expect it would be in the lead in, lead out setup.
Scott McGourley
Tampa, FL
"You can either watch it happen, make it happen or wonder why the F^&K it happened" --Phil Harris-- The Deadliest Catch (RIP)
Tampa, FL
"You can either watch it happen, make it happen or wonder why the F^&K it happened" --Phil Harris-- The Deadliest Catch (RIP)
-
Ken Lago
- SFA Member
- Posts:6000
- Joined:Tue Oct 27, 2009 9:18 am
- Has thanked: 68 times
- Been thanked: 283 times
Re: programing tips
I don't have that problem either.steven nenzel wrote:John has some great ideas but we do not run seams first unless it is a euro miter. If you run the a straight seam before the edge detail, the edge detail will slightly indent on the front of the seam.
Ken Lago
Granite Countertop Experts llc
5875 jefferson Ave. Newport News Va 23605
Cell# 757-214-4944
Office# 757-826-9316
Email: klago@TheGraniteExperts.com
www.TheGraniteExperts.com
Granite Countertop Experts llc
5875 jefferson Ave. Newport News Va 23605
Cell# 757-214-4944
Office# 757-826-9316
Email: klago@TheGraniteExperts.com
www.TheGraniteExperts.com
-
ash20ash
- Posts:3932
- Joined:Sun Nov 01, 2009 9:00 am
- Location:Georgtown,IN
- Has thanked: 5 times
- Been thanked: 20 times
- Contact:
Re: programing tips
Ken Lago wrote:I don't have that problem either.steven nenzel wrote:John has some great ideas but we do not run seams first unless it is a euro miter. If you run the a straight seam before the edge detail, the edge detail will slightly indent on the front of the seam.
x2
-
steven nenzel
- SFA Member
- Posts:2085
- Joined:Tue Oct 27, 2009 7:11 pm
- Has thanked: 13 times
- Been thanked: 90 times
Re: programing tips
WTF, then you guys are not running your machines right!
Seriously, right at the very edge of the seam, if run first, you don't get a very slight indent? I would have thought this to be the norm as the pressure from the polisher is released at the tip of the stone. I know we are not using to much pressure. Will have to look into this.
Seriously, right at the very edge of the seam, if run first, you don't get a very slight indent? I would have thought this to be the norm as the pressure from the polisher is released at the tip of the stone. I know we are not using to much pressure. Will have to look into this.
Steven Nenzel
Rock-It Surfaces
947 Rancheros Dr
San Marcos, CA 92069
760-597-1800
steven@rockyourhome.com
www.rockyourhome.com
Rock-It Surfaces
947 Rancheros Dr
San Marcos, CA 92069
760-597-1800
steven@rockyourhome.com
www.rockyourhome.com
-
Eric R
- SFA Director

- Posts:2635
- Joined:Wed Nov 04, 2009 8:58 am
- Has thanked: 37 times
- Been thanked: 79 times
Re: programing tips
X3ash20ash wrote:x2
As for tips. - Use your tool directions to cut away from any potential blowouts/chipouts. Like at a seam, I always run from the front of the countertop towards the wall side. That way it doesn't chip out the front edge. Or should I say the edge that doesn't have an indent
Re: programing tips
Ash,
Few years down the road, look back at some of the first programs you ever wrote! You'll get a kick out of it! I know i sure did haha
Few years down the road, look back at some of the first programs you ever wrote! You'll get a kick out of it! I know i sure did haha
Brett Harris
CNC Programmer/Operator
CNC Programmer/Operator
-
ash20ash
- Posts:3932
- Joined:Sun Nov 01, 2009 9:00 am
- Location:Georgtown,IN
- Has thanked: 5 times
- Been thanked: 20 times
- Contact:
Re: programing tips
Ha. 3 months and I'm allready shaking my head at what I was doing.
Finally picking up a little speed.
Finally picking up a little speed.
Re: programing tips
Polisher won't cause the indent I don't think, but a glazed metal 3 or 4 probably would.....Is your 3 or 4 metal real loud????? It is common for this to happen as pos 1 and 2 wear fast putting more pressure on the 3 and 4 which cannot take off much material so they put pressure instead. Normally I have to back them off from time to time as the 1 and 2 wear....The other thing is, run your Z to dress the seam after you run the profile edge. Maybe this is why it doesn't happen to us as we are taking off 2mm with the Z....
Scott McGourley
Tampa, FL
"You can either watch it happen, make it happen or wonder why the F^&K it happened" --Phil Harris-- The Deadliest Catch (RIP)
Tampa, FL
"You can either watch it happen, make it happen or wonder why the F^&K it happened" --Phil Harris-- The Deadliest Catch (RIP)